SVG Motion Paths
Building a simple HTML5 game this week I've learned heaps about motion graphics, Canvas and SVG. I've also learnt a few new tricks with Sass and CSS transitions for keeping my code clean.
Game On
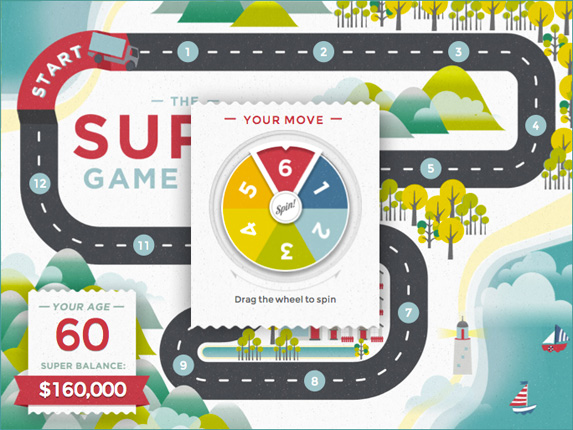
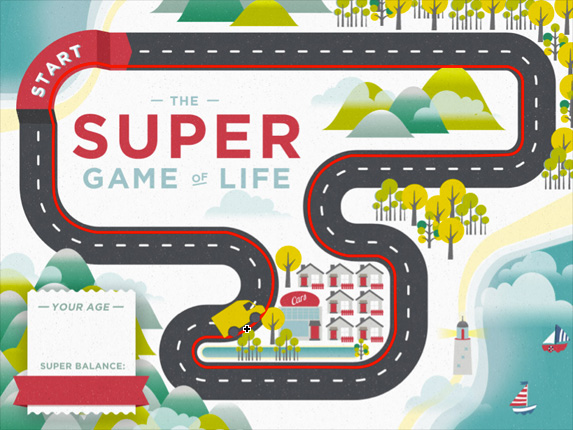
The Super Game of Life was beautifully designed by a Melbourne design agency, it's a simple turn based game with multiple choice answers.
You spin to move your car around the track, answering questions along the way, if you answer correctly you add sweet moolah to your Super, as you pass Go you collect 2 years. The game ends when you answer all 12 questions correctly or are 10 years wiser.
Animation basics
All animation libraries at their core are a loop that runs as many times as they can over a given time, throughout the loop they calculate the change in position by multiplying the total distance by a progress(between 0 and 1) by an easing function. Easing functions make an animation slow down or speed up throughout the animation.
Here's a simple example showing how a position between 0 and 100 could be calculated.
var easing = {
  linear: function (n) {
    return n;
  },
  easeIn: function (n) {
    return Math.pow(n, 1.7);
  },
  easeOut: function (n) {
    return Math.pow(n, .48);
  }
}
var progress = [0,.1,.2,.3,.4,.5,.6,.7,.8,.9,1];
var distance = 100;

for (var i=0, ii = progress.length; i<ii; i++) {
  var position = distance * easing.linear(progress[i])
  console.log(position);
}
| linear | 0 | 10 | 20 | 30 | 40 | 50 | 60 | 70 | 80 | 90 | 100 |
|---|---|---|---|---|---|---|---|---|---|---|---|
| easeIn | 0 | 2 | 6 | 13 | 21 | 31 | 42 | 55 | 68 | 84 | 100 |
| easeOut | 0 | 33 | 46 | 56 | 64 | 72 | 78 | 84 | 90 | 95 | 100 |
Read through the source of Animator.js if you want to learn more about it.
The Car
I'm a big fan of Raphael.js so at first I tried to use SVG exclusively for the car, animation and path tracking - and it was working, but testing on the first generation iPad the performance was just too slow to have the desired effect for the game. I ended up using SVG for the path & Canvas for the rendering.
Motion paths
SVG paths have the DOM methods getTotalLength() and getPointAtLength(length) which can be used to get specific points along a path. Those are all we need to move an element along an SVG path with some simple animation timers - I used jQuery's animate function to do this so I didn't have to re-invent them. You could pull parts of Animator.js out if you wanted to this yourself.
Rotation
Math.atan2(point2.x-point1.x, point2.y-point1.y) returns the angle between two points in radians.
When drawing an image on a rotated canvas you need to draw relative to the pivot point of the image - In the case of the car that's the point at the base between the wheels. ctx.drawImage(image, 0-(width/2), 0-height, width, height);
Canvas' transformation matrix
It took me a little while to understan Canvas' translation matrix, the Mozilla Canvas docs helped.
If you're going to be using rotation in your canvas animations you'll need to use save() and restore() to save the current transformation matrix so that you can get back to different points in building the frames. I think of it as building a frame on the way up using translate, rotate & draw, then tearing it back down again on the way back.
- clear - entire canvas
- save - untransformed matrix at (0,0)
- translate - point(x,y)
- rotate - radians
- draw - relative to pivot point
- restore - restore untransformed matrix
The code
var game = {
  postion: 1,
  steps: 5,
  halfPi: Math.PI/2,
  initPaper: function() {
    var p = game.paper = Raphael('paper', 1022, 762);
    game.path = p.path('M196.5,117.5L906,118c0,0,27.038,5.5,27,29c-0.039,24.331,0,96,0,96s2,28-23,32s-283,2-283,2s-75.86,11.37-76,91c-0.142,81.018,71,88,71,88h52c0,0,31,6,31,40s1,92,1,92s-8,68-74,67s-264,0.011-264,0.011s-24-2.934-24-29.011c0-22.5,22.913-25.153,22.913-25.153L408,601c0,0,75-17,79-94s-82.742-93.03-82.742-93.03L173,414c0,0-76-6-78-78s0-113,0-113l7-28c0,0,0-39,26-62s60-21,60-21L196.5,117.5z').attr({ 'stroke-width': 0 });
    game.pathPoints = [.96, .01, .1, .176, .247, .31, .42, .5, .570, .645, .71, .81, .882, .999];
    game.pathLength = game.path.getTotalLength();
    game.canvas = document.getElementById('canvas');
    game.ctx = dgame.canvas.getContext("2d");

    var img = new Image();
    img.src = 'img/car-work-horse-small.png';
    game.carImage = img;
    game.animateCar(.95, 1, 1000);
  }
  stepCar: function() {
    if (game.steps == 0) return;
    game.steps--;
    var start = game.position;
    game.position++;
    game.animateCar(game.pathPoints[start], game.pathPoints[game.position], 1000, game.stepCar);
  },
  paintCar: function(point) {
    game.x = point.x;
    game.y = point.y;

    var ctx = game.ctx;
    ctx.clearRect(0, 0, game.canvas.width, game.canvas.height);
    ctx.save();
    ctx.translate(game.x, game.y);
    ctx.rotate(game.rotation);
    ctx.drawImage(game.carImage, 0-(game.carWidth/2), 0-game.carHeight, game.carWidth, game.carHeight);
    ctx.restore();
  },
  animateCar: function(start, end, time, complete) {
    var distance = (end-start)*game.pathLength;
    start = start * game.pathLength;
    var ctx = game.ctx;
    var dy, dx, rotation;
    $canvas.animate({ "progress": 1 }, {
      easing: "linear",
      duration: time,
      step: function(a, obj) {
        var point = game.path.getPointAtLength(start + (obj.state * distance));
        dx = point.x-game.x;
        dy = point.y-game.y;
        var rotation = 0-(Math.atan2(dx,dy) - game.halfPi);
        if (dx == 0 && dy == 0) return; /* same point */
        game.rotation = rotation;
        game.paintCar(point);
      },
      complete: complete || function() {}
    });
  }
}
The Spinner
I started out making the spinner rotate with CSS transitions when a click & drag was detected. That was pretty simple to achieve with CSS transitions for a smooth animation with easing. Sass also helped keep the code nice and simple with math, variables & loops.
#wheel {
  background: url(../img/spinner.png);
  height: 230px;
  width: 230px;
  position: absolute;
  @include transition(all 1.5s ease-out);
  @for $i from 1 through 6 {
    $rotation = 360deg*3 + $i*60;
    &.spin-#{$i} {
      @include transform(rotate($rotation));
    }
    &.reverse.spin-#{$i} {
      @include transform(rotate(0-$rotation));
    }
  }
}
var touching = false;
var down = function(event) {
  touching = true;
  return false;
}
var move = function(event) {
  if (touching && !game.spinning) {
    spin();
    touching = false;
  }
}
var up = function(event) {
  touching = false;
}
if (window.Touch) {
  $spinner.bind('touchstart',down);
  $spinner.bind('touchmove',move);
  $spinner.bind('touchend',up);
}
else {
  $spinner.mousedown(down);
  $spinner.mousemove(move);
  $spinner.mouseup(up);
}

function spin() {
  game.spinning = true;
  var number = Math.floor(Math.random()*6)+1;
  $wheel.addClass('spin-'+number);
  game.steps = 6-number || 6;

  setTimeout(function() {
    $wheel.removeClass();
    game.spinning = false;
  }, 3000);
}
Going both ways
Making the spinner go in the reverse was a little more challenging. I needed to capture two points and then figure out which direction it was moving relative to the center of the spinner.
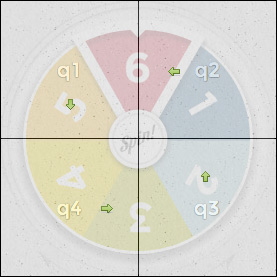
I ended up finding a pretty easy solution by dividing the spinner into into 4 quadrants and simply checking it was moving in one direction. Not perfect, but it works for real world cases.
e.g. If you touched in q1 it's spinning in reverse if you move down.
var offset = $wheel.offset();
var pos = null,
quadrant = null,
center = { x: offset.left+115, y: offset.top+115 };

function getPos(event) {
  return {
    x: event.pageX,
    y: event.pageY
  }
}
function getQuadrant() {
  if (pos.x <= center.x && pos.y <= center.y)
    return 1;
  if (pos.x >= center.x && pos.y <= center.y)
    return 2;
  if (pos.x >= center.x && pos.y >= center.y)
    return 3;
  if (pos.x <= center.x && pos.y >= center.y)
    return 4;
  return null;
}
var down = function(event) {
  event = (window.Touch) ? event.originalEvent.touches[0] : event.originalEvent;
  pos = getPos(event);
  q = getQuadrant();
}
var move = function(event) {
  event = (window.Touch) ? event.originalEvent.touches[0] : event.originalEvent;
  var pos2 = getPos(event);
  if ((q == 1 && pos2.y > pos.y)
   || (q == 2 && pos2.x < pos.x)
   || (q == 3 && pos2.y < pos.y)
   || (q == 4 && pos2.x > pos.x)) {
    game.spinReverse = true;
  }
  else {
    game.spinReverse = false;
  }
}
var up = function(event) {
  pos = null;
}
Modals and ornaments

The dialogs are positioned off screen and transitioned in just by adding a class 'active'. There's really no need for complex javascript frameworks to achieve these sorts of effects anymore - with CSS3's transitions it makes it easy.
I've started using generated content for ornamental elements that aren't absolutely necessary for an element to function like the ribbons top & bottom of the dialogs.
<div id="overlay" class="active"></div>
<div id="choose" class="card active"></div>
#overlay {
  background: rgba(0,0,0,.4);
  position: fixed;
  height: 100%;
  width: 100%;
  opacity: 0;
  @include transition(opacity .3s linear);
  &.active {
    opacity: 1;
  }
}
.card {
  position: absolute;
  top: -800px;
  opacity: 0;
  background: #fff url(../img/texture.jpg);
  @include transition(all .5s ease-in);
  &.active {
    top: 115px;
    opacity: 1;
  }
  &:before {
    content: '';
    height: 11px;
    position: absolute;
    top: -11px;
    left: 0;
    right: 0;
    background: url(../img/ribbon-top.png);
  }
  &:after {
    content: '';
    height: 11px;
    position: absolute;
    bottom: -11px;
    left: 0;
    right: 0;
    background: url(../img/ribbon-bottom.png);
  }
}
These newer CSS properties make the code a lot leaner and easier to change, the way it should be.
And that's it! I hope some of the code is useful in your own projects.